-
Notifications
You must be signed in to change notification settings - Fork 6
Usage
Administrators should access the <app_path>/admin/ (where <app_path> is the URL to the application) page to manage the platforms which are permitted to use the application. The page displays a list of defined tool platforms in name order.

| Name | Description | Required? | Default value |
|---|---|---|---|
| Name | A display name for this tool platform entry | Yes | None |
| Key | A unique string to identify the VLE connecting to the application | Yes | None |
| Secret | A secret used to secure the LTI launch | Yes | A random string |
| Enabled? | Whether launch requests from this platform should be accepted | No | No |
| Enable from | Date/time from which launch requests for this consumer key will be accepted (e.g. 1-Jul-2020 00:00) | No | None |
| Enable until | Date/time until which launch requests for this consumer key will be accepted (e.g. 31-Jul-2020 23:59) | No | None |
| Protected? | Whether launch requests from this platform should only be accepted if the same GUID value is passed | No | No |
| Properties | Name and value pairs for the platform settings, such as those used to configure an API hook | No | None |
| Debug mode? | Whether debug-level logging should be enabled for connections using this platform | No | No |
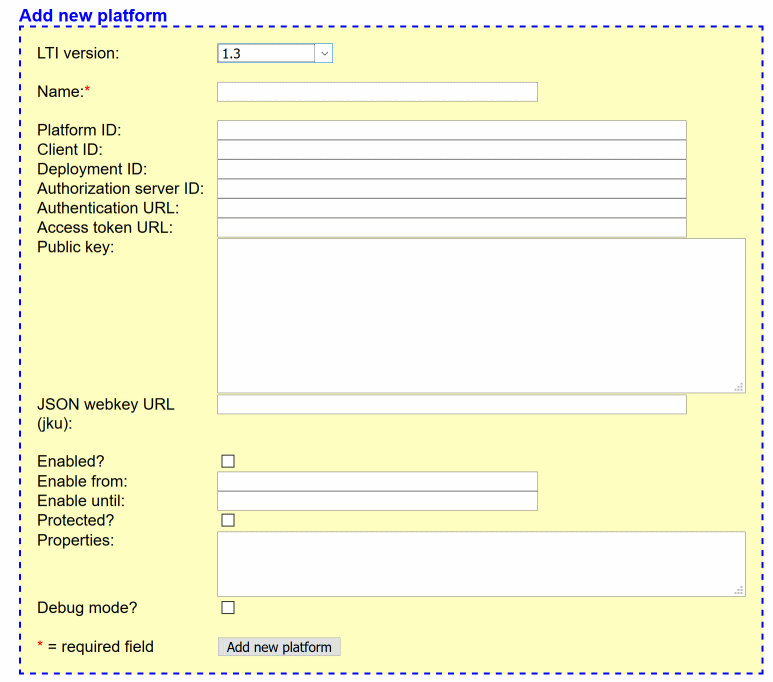
If LTI 1.3 is selected as the LTI version, the key and secret fields are hidden and replaced with the following:

| Name | Description | Required? | Default value |
|---|---|---|---|
| Platform ID | The platform's Platform ID | No | None |
| Client ID | The platform's Client ID | No | None |
| Deployment ID | The platform's Deployment ID | No | None |
| Authorization server ID | The platform's ID to use when making requests to its Authorization server | No | None |
| Authentication URL | The platform's Authentication request endpoint | No | None |
| Access token URL | The platform's Access Token service endpoint | No | None |
| Public key | The platform's public key in PEM format | No | None |
| JSON webkey URL (jku) | The platform's endpoint for retrieving its public keys | No | None |
These values should be provided by the platform. Note that:
- A Platform ID, Client ID and a Deployment ID must all be specified
- The Authorization server ID will default to the Access token URL is left blank
- Only one or other of the JSON webkey URL and the public key is needed; it is not necessary to specify both (use whichever is provided by the platform)
- A platform may be defined with both LTi 1.0/1.1/1.2 credentials and values for supporting LTI 1.3; the tool will then accept requests using any version of LTI
For a platform to be marked as available it must be both enabled and the current time must fall between any enable from/until dates specified. If a platform is not available, its row in the table will be displayed with a grey background. The version column is completed with data provided by an LTI launch request; the tool consumer GUID is displayed when placing the mouse over the value.
A new platform can be added by entering its details in the form provided at the bottom of the page. An existing platform definition can be edited by clicking on the edit icon in the Options column of the table. This will add its details in the table at the bottom of the page; click on the Update platform button to save any changes, or click on Cancel to clear the form. Click on the delete icon in the Options column to delete an existing platforms definition.
The launch URL (<app_path>/connect.php), consumer key and secret should be communicated by a secure means to the administrator of the VLE for which they were created so that they can be used to add the Rating application to their system.
The registration URL (<app_path>/connect.php) can be used in Moodle 3.10+ to initiate a dynamic registration of the tool with the platform. This will automatically share the tool's LTI 1.3 details with the platform and add a platform definition to the tool. By default the new platform will not be enabled, but the following settings can be used to alter that:
| Name | Description | Example | Default value |
|---|---|---|---|
| AUTO_ENABLE | When true newly registered platforms will be automatically enabled |
true | false |
| ENABLE_FOR_DAYS | When the auto-enabling option is being used, this option can be used to set the number of days for which the platform will be enabled | 14 | NA |
You can copy the example entries from the config-dist.php file.
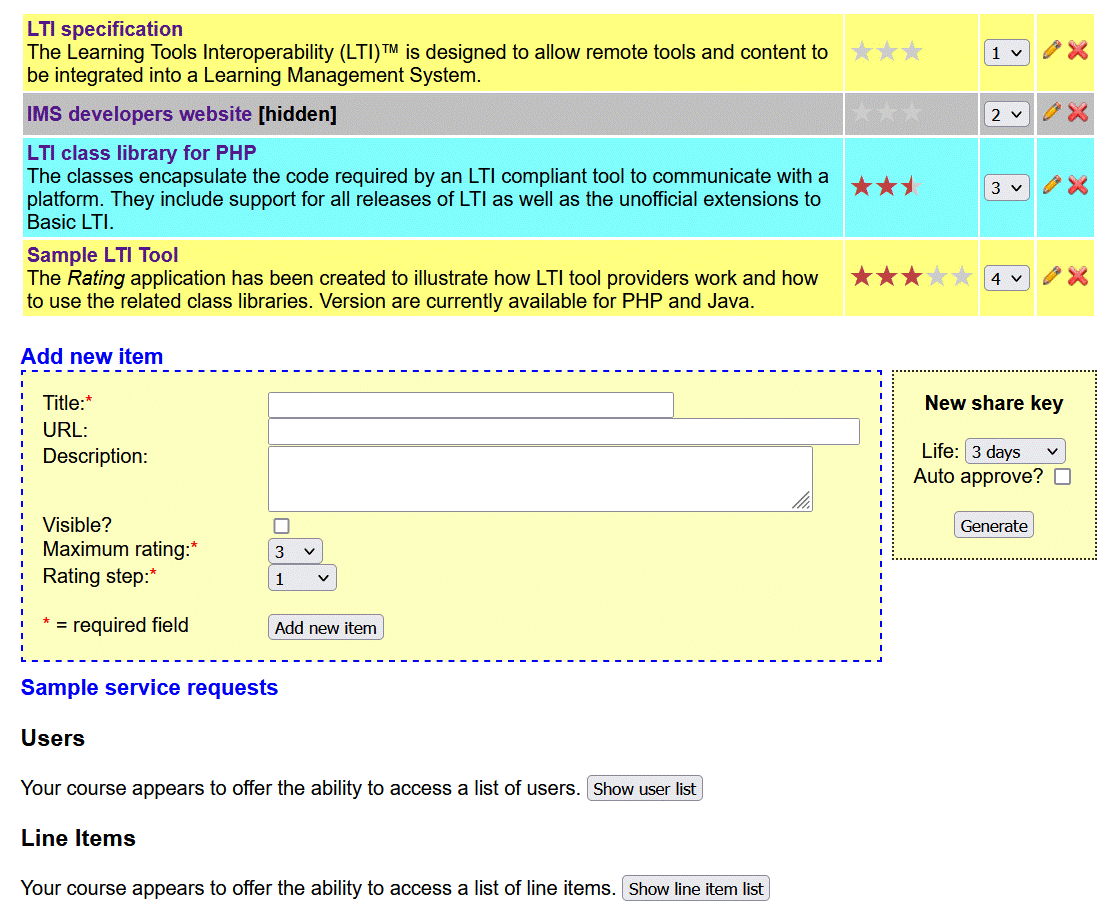
If a teacher launches a link to the Rating application from within their course, a page listing the items to be rated is displayed. The list displayed is specific to the link which was followed.

| Name | Description | Required? | Default value |
|---|---|---|---|
| Title | The heading displayed for the item | Yes | None |
| URL | A URL used as a hyperlink for the title | No | None |
| Description | A description of the item | No | None |
| Visible? | Whether the item is displayed to students | No | No |
| Maximum rating | The maximum rating value which a student can award the item | Yes | 3 |
| Rating step | The increment used when awarding ratings | Yes | 1 |
Alternate rows within the list of items are given a different background colour; hidden items are marked [hidden] and displayed with a grey background. The maximum rating determines the number of stars displayed against the item. The rating value (displayed as red stars) is the average rating awarded by students to the item. Hovering the mouse over a rating will display its numeric value.
A new item can be added by entering its details in the form provided at the bottom of the page. Items can be re-ordered by selecting a new position for an item from the drop-down list provided. An existing item definition can be edited by clicking on the edit icon in the Options column of the table. This will add its details in the table at the bottom of the page; click on the Update item button to save any changes, or click on Cancel to clear the form. Click on the delete icon in the Options column to delete an existing item definition.
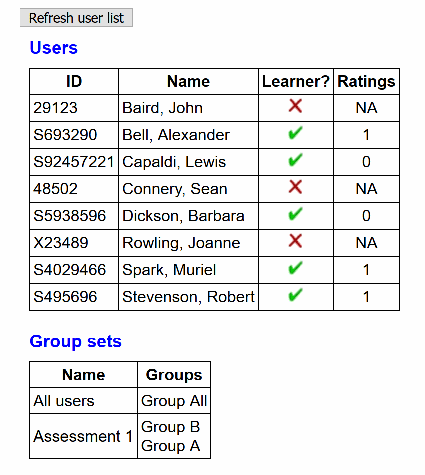
If the VLE supports the Memberships service, then a Show user list button is displayed. Clicking this button will refresh the page with a list of users enrolled in the course and show whether they have a student role and, if so, how many items they have rated.

If the VLE also provides group information, a list of the group sets and the names of the groups with at least one member is shown (for information only).
If the VLE supports the LineItem service, then a Show line item list button is displayed. Clicking this button will refresh the page with a list of the tool's line items associated with the course.

If a student launches a link to the Rating application from within their course, a page listing the items to be rated is displayed. The list displayed is specific to the link which was followed.

A student may rate an item by clicking on the appropriate star; if an increment step less than one has been selected for the item then the student should click on the appropriate section of the star. The numeric value of the rating is displayed when the mouse is hovered over the stars. A student is only permitted to rate each item once.
If a resource link supports the LTI Outcomes service then the associated gradebook column is used to record the proportion of visible items each student has rated. This means that the grades column will be updated when the following events occur:
- a new or existing item is made visible;
- an item's visibility is disabled;
- a user rates an item
If a change leads to no items being visible then any gradebook entries will be deleted; otherwise the value will be zero (if the user has not rated any of the visible items), one (if all of the visible items have been rated by the user), or a value between zero and one when a user has rated some, but not all, of the visible items.
Note, this is just one way in which the application could link a student's activity to an LTI outcome value between 0 and 1 and has been added to illustrate the use of the Outcomes service.
If the Line Item service is also supported, then a new line item is created in the VLE course for each visible item and the student's rating value is saved in it. This line item will be deleted if the item is deleted or its visibility is disabled.
The connect.php endpoint for this application also accepts ContentItemSelectionRequest messages. In this situation the normal instructor page has additional buttons at the bottom to save the item to the platform or to cancel the creation of an item. The former button is only enabled when the list has at least one item in it so as to prevent links to empty lists from being created. A placement will be included in the content-item definition returned to the platform if at least one of the following document targets was offered in the message received:
- overlay
- popup
- iframe
- frame
The placement selected will be the first one from the above list which was offered. Only a single list can be created at a time.
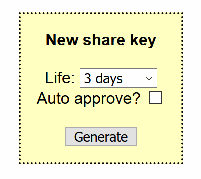
Using a share key allows you to share a rating list with users from more than one resource link. These resource links might be:
- other links from within the same course;
- links from other courses in the same VLE; or even
- links from a different VLE within the same institution or outside.

To invite another resource link to share a rating list:
- use the button on the page of the rating list to be shared to generate a new share key (you may choose to pre-approve the share or leave it to be approved once the key has been initialised, see below);
- send the share key to an instructor for the other resource link.
On receipt of the share key string (e.g. "share_key=xyz"), an instructor with access to the other resource link should:
- if it does not already exist, create an LTI link to the same instance of the
Ratingapplication (using their own consumer key and secret if different); - add the share key string to the custom parameters for the resource link;
- initialise the share by clicking on the link to launch the
Ratingapplication; - if the share has not been pre-approved the connection will fail and they should notify the original instructor so that the share can be approved on the page of the rating list being shared.
Once the share has been approved all users from the other resource link will be directed into the same rating list. WHen opening the rating list being shared, instructors will see a list of the other resource links which share it. The list has options to approve/suspend the sharing with a specific resource link, or to cancel the share request completely. Instructors opening the rating list from the resource links which are sharing the list do not have access to view or manage the shares.
© 2020 Stephen P Vickers. All Rights Reserved.