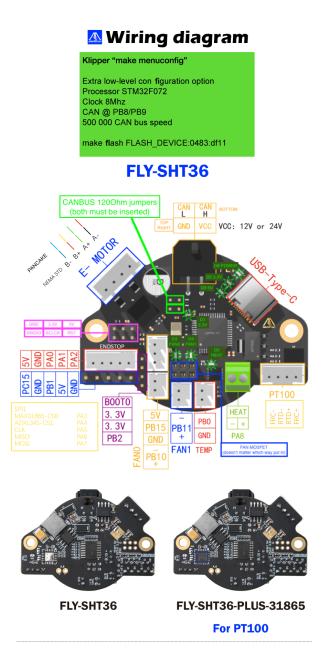
This guide assumes you alreay have a working Klipper installation
- ssh to your pi console
- CD to the klipper directory
cd klipper
- Run MAKE Clean
make clean
- open menuconfig
make menuconfig
-
compile the firmware
make
- You should now have a klipper.bin file at ~/klipper/out/
-
Install the boot jumper to the Boot0 pin and 3.3v pin as pictured.
-
Install the burning utility to your klipper host system
sudo apt install dfu-util -y
- Use USB-C data cable to connect the SHT board to the klipper host, Make sure that the jumper is installed before connecting the USB cable.
- Run LSUSB to see if the connection is successful, copy the USB ID in the blue box. Note that the board is in DFU mode.
lsusb
- Burn the firmware , replace 0483:df11 in the following command with the USB ID copied earlier
dfu-util -a 0 -d 0483:df11 --dfuse-address 0x08000000 -D ~/klipper/out/klipper.bin
-
You should get a download progress bar and File downloaded successfuly when the burning is complete.
-
If the burn was sucessful remove the USB cable and the jumper from the Boot0 pin
-
The tool board is now ready to install as a klipper MCU. **Repeat these steps if a klipper update requires flashing new firmware to the MCU.
- Klipper Host configuration
- Create a new file named /etc/network/interfaces.d/can0 with the following contents or read below to download a copy.
auto can0
iface can0 can static
    bitrate 250000
    up ifconfig $IFACE txqueuelen 1024
A copy of this file can be downlaoded here. SFTP this file to your Klipper host /home/pi directory and run this line from the ssh console to move it to the correct directory.
sudo cp /home/pi/can0 /etc/network/interfaces.d/
-
Waveshare RP485 CAN Hats will need further configuration - More on this section soon.
Waveshare instructions -
Klipper CANBUS configuration
-
Finding the canbus_uuid for new micro-controllers¶ Each micro-controller on the CAN bus is assigned a unique id based on the factory chip identifier encoded into each micro-controller. To find each micro-controller device id, make sure the hardware is powered and wired correctly, and then run:
~/klippy-env/bin/python ~/klipper/scripts/canbus_query.py can0
If uninitialized CAN devices are detected the above command will report lines like the following:
Found canbus_uuid=11aa22bb33cc
Each device will have a unique identifier. In the above example, 11aa22bb33cc is the micro-controller's "canbus_uuid".
Note that the canbus_query.py tool will only report uninitialized devices - if Klipper (or a similar tool) configures the device then it will no longer appear in the list.
- Configuring Klipper¶ Update the Klipper mcu configuration to use the CAN bus to communicate with the device - for example:
Add the following lines to your printer.cfg file using your canbus_uuid
[mcu sht36]
canbus_uuid: 11aa22bb33cc
-
more needed here for configuring Can bus network settings.
-
USB Configuration
- Run the following command at the Klipper host SSH console to get the serial path for the SHT board.
ls -l /dev/serial/by-id/
- Note the ID containing 'stm32f072xb'
Add the following lines to your printer.cfg file replacing the USB ID with the one you copied in the last section.
[mcu sht36]
serial: /dev/serial/by-id/usb-Klipper_stm32f072xb_240024001757425835303220-if00
Impoprtant: THe SHT-36 has 120 ohm jumpers. If you board is the last device on the CAN bus it needs to have the jumpers installed.
THe CANBUS needs to red 60 ohms across the L and H wires.
Upload the utoc_firmware.bin file to a folder on your Pi.
Mellow UTOC firmware
install the DFU mode Jumper
 Connect the UTOC by USB to the Pi
From the Pi command line run
lsusb
You should see
Bus 001 Device 004: ID 0483:df11 STMicroelectronics STM Device in DFU Mode
Run the following to flash the board
sudo dfu-util --dfuse-address -d 0483:df11 -c 1 -i 0 -a 0 -s 0x08000000 -D ~/CanBoot/utoc/utoc_firmware.bin
https://mellow.klipper.cn/?spm=a2g0o.detail.1000023.17.566a6b5carjmy3#/board/fly_sht36_42/pins
https://mellow.klipper.cn/?spm=a2g0o.detail.1000023.17.566a6b5carjmy3#/board/fly_sht36_42/pins
https://github.com/Mellow-3D/Klipper-CAN-Toolboards
https://mellow.klipper.cn/?spm=a2g0o.detail.1000023.17.566a6b5cQK0pdg#/advanced/can
https://mellow.klipper.cn/?spm=a2g0o.detail.1000023.17.566a6b5cQK0pdg#/advanced/canboot
https://www.klipper3d.org/CANBUS.html
https://www.waveshare.com/wiki/RS485_CAN_HAT
Kevin O'Conner Experemental USB to CANBUS bride mode discussion. _ Recently merged into the main Klipper branch. Allows using compatible MCUs like the Octopus as your CANBUS node for the Klipper host. No USB CAN Interface or Pi HAT needed.
https://klipper.discourse.group/t/experimental-usb-to-canbus-bridge-mode/3136
https://maz0r.github.io/klipper_canbus/controller/candlelight_fw.html#httpscanableioupdater


