- PyVenus
PyVenus is developed as an interface between the Hamilton Venus software and Python. If you don't have a Hamilton liquid handler and are not familiar with Venus this might not be for you :)
The following assumes that you have a basic understanding of Venus and using submethod libraries.
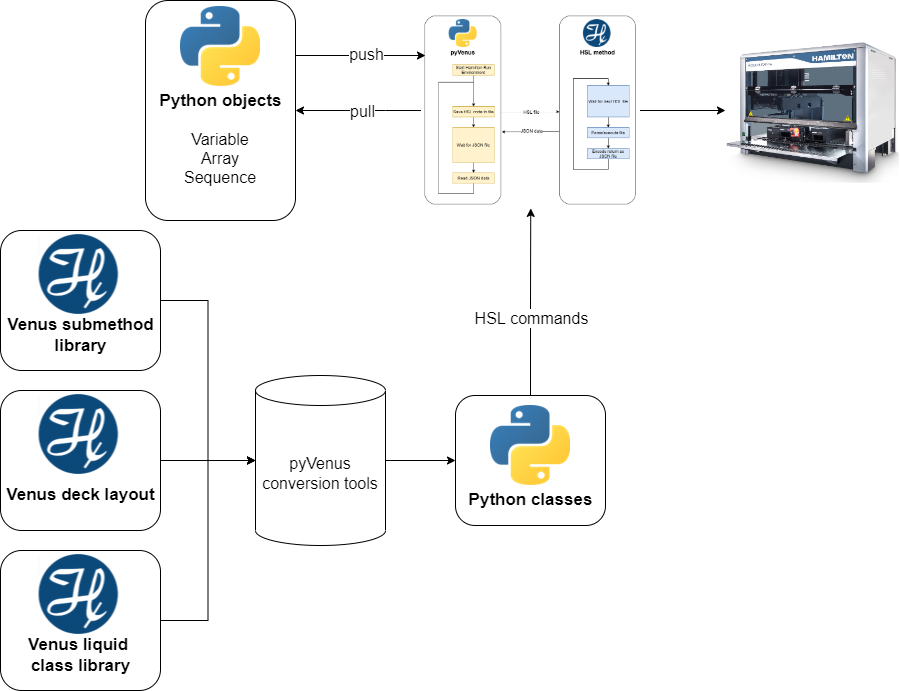
Both Python and Venus have their strength and weaknesses and PyVenus is trying to create synergy between them. The basic idea is that you can exploit the strength of Venus when it comes to anything relating to controlling your liquid handler:
- Setup a decklayout and define sequences
- Define liquid classes
- Setup pipetting steps (and other commands that control the robot, such as transports)
While anything else, like your method logic, data handling, etc. can be done in Python, which is much more suited to this task.
- The first step is to define one or more submethod libraries in Venus. This could be simple (or more complex) pipetting functions, but also simple wrappers for any functionality in Venus.
- PyVenus parses these libraries and generates corresponding Python classes.
- These classes allow you to call the Venus submethods as if they were native Python code.
The beauty is that you do not need to know how PyVenus works in the background, but you simply setup submethod libraries in Venus and, after code generation, treat them like regular Python classes & functions.
There are a few different resources to get you started:
- This readme file walks you through all the relevant information
- The example methods in this repository
- The full API reference: https://sniprbiome.github.io/PyVenus
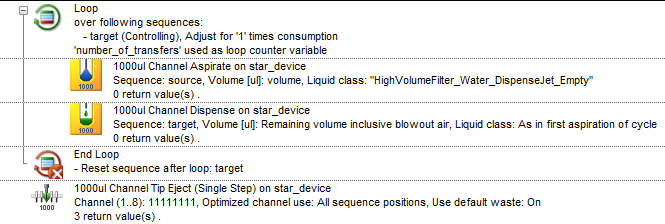
Assume you have the following simple submethod in a library that transfers buffer to a target:
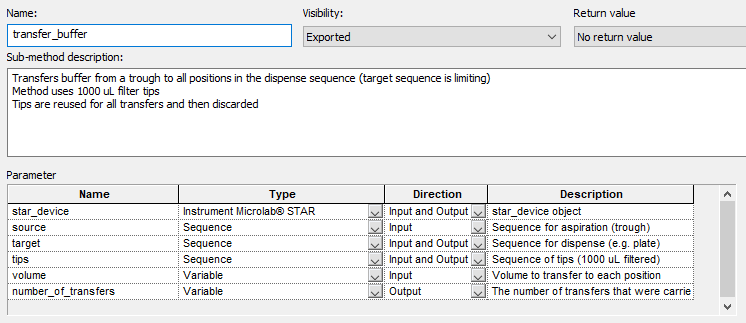
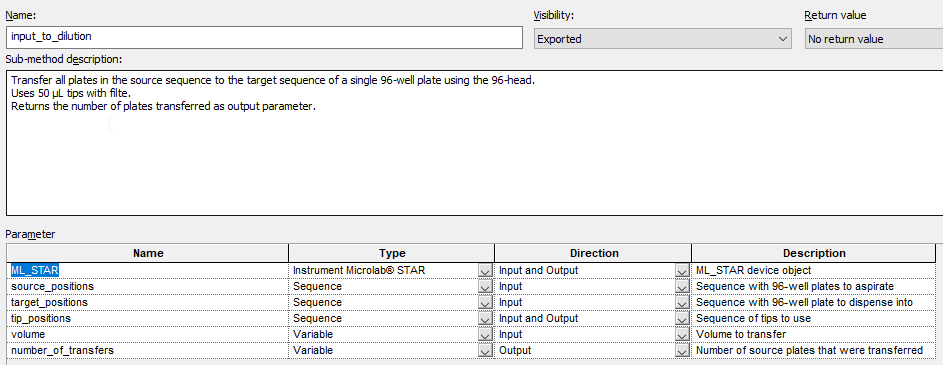
The submethod has a number of input and output parameters as shown here:
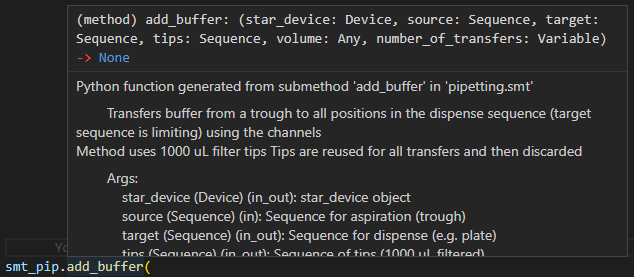
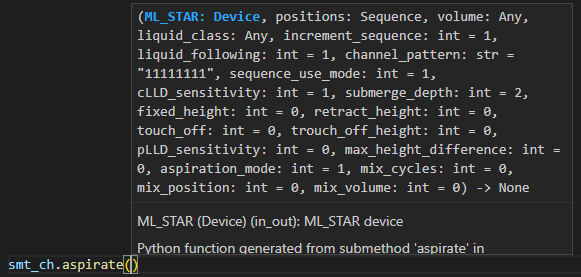
PyVenus generates a python class from the submethod library that has a function of the same name as the submethod:
The different data types of Venus are implemented through corresponding python classes.
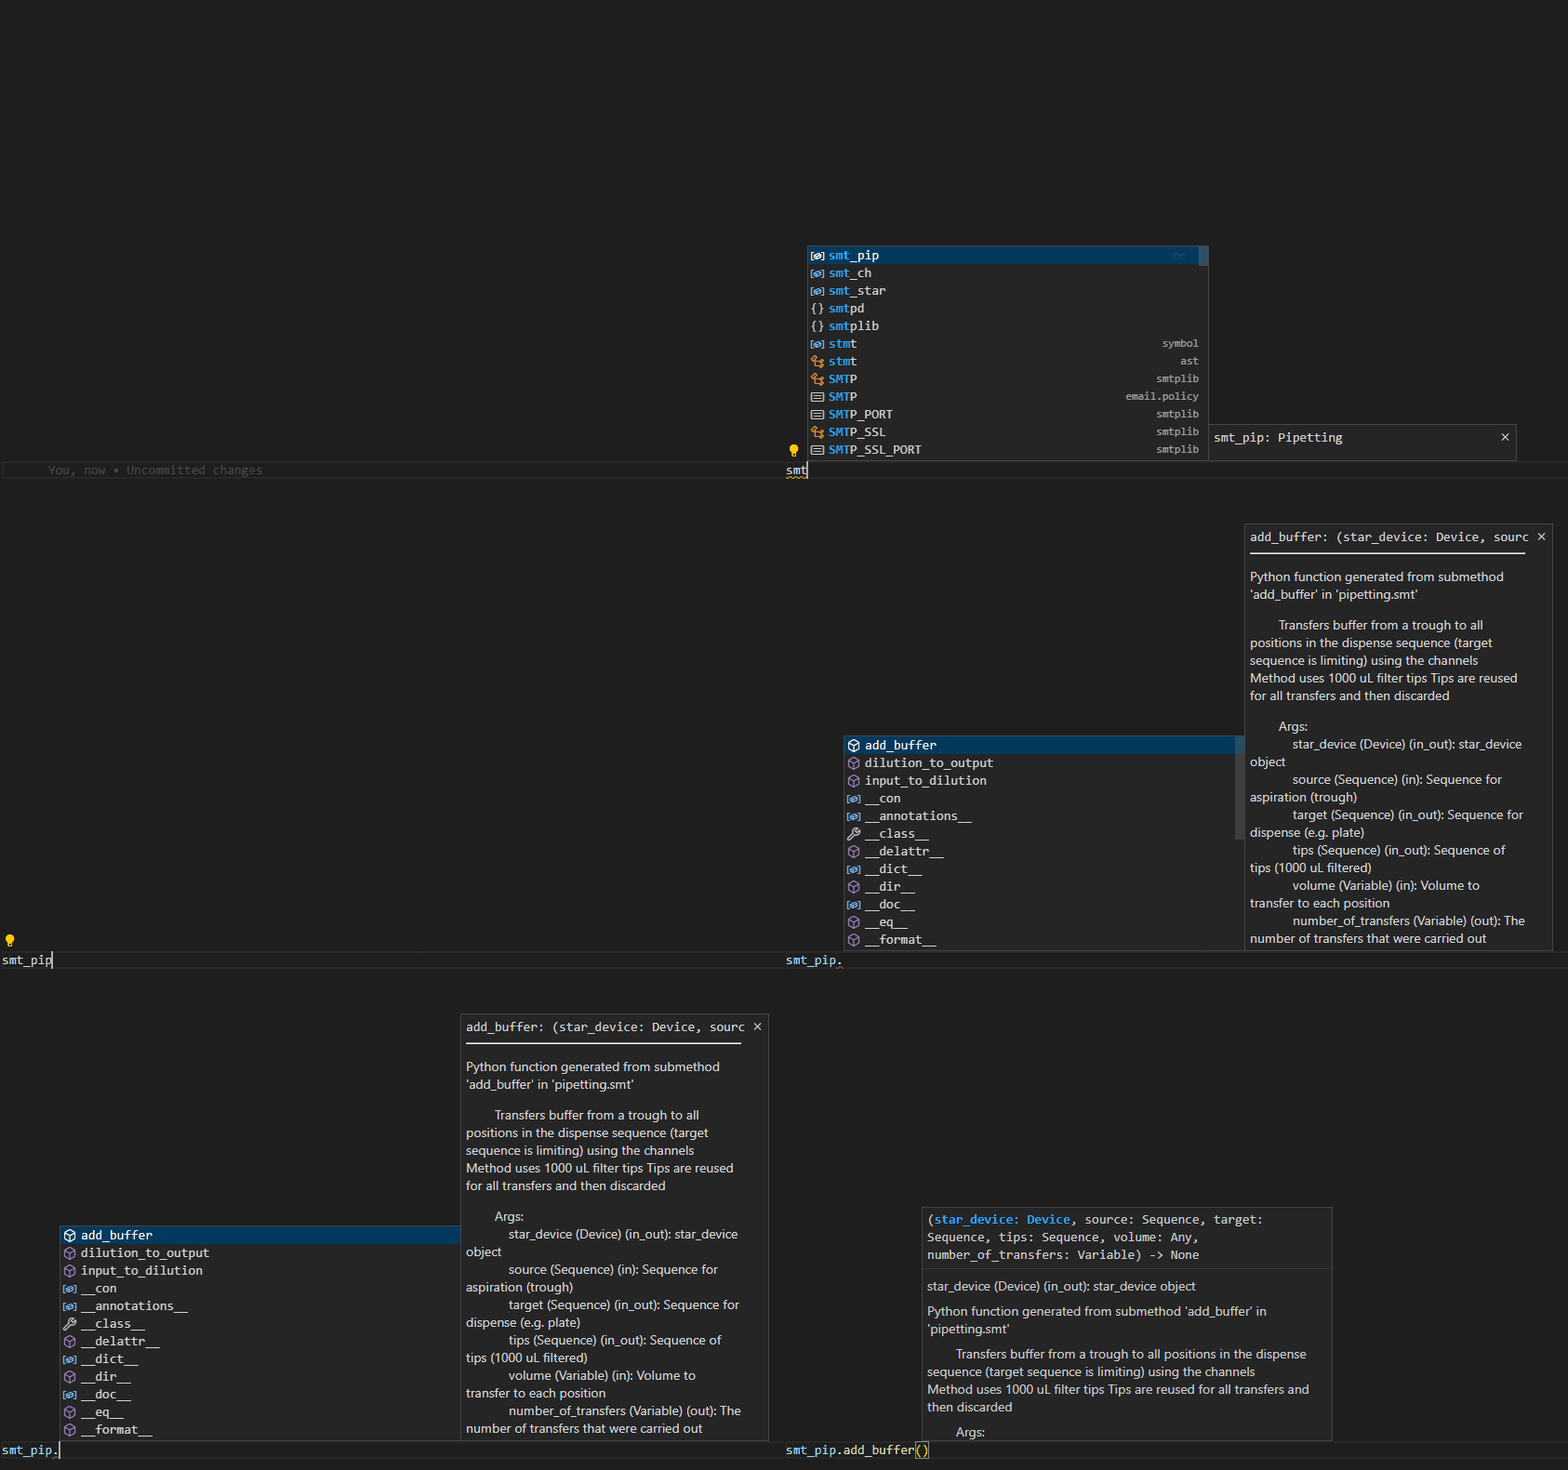
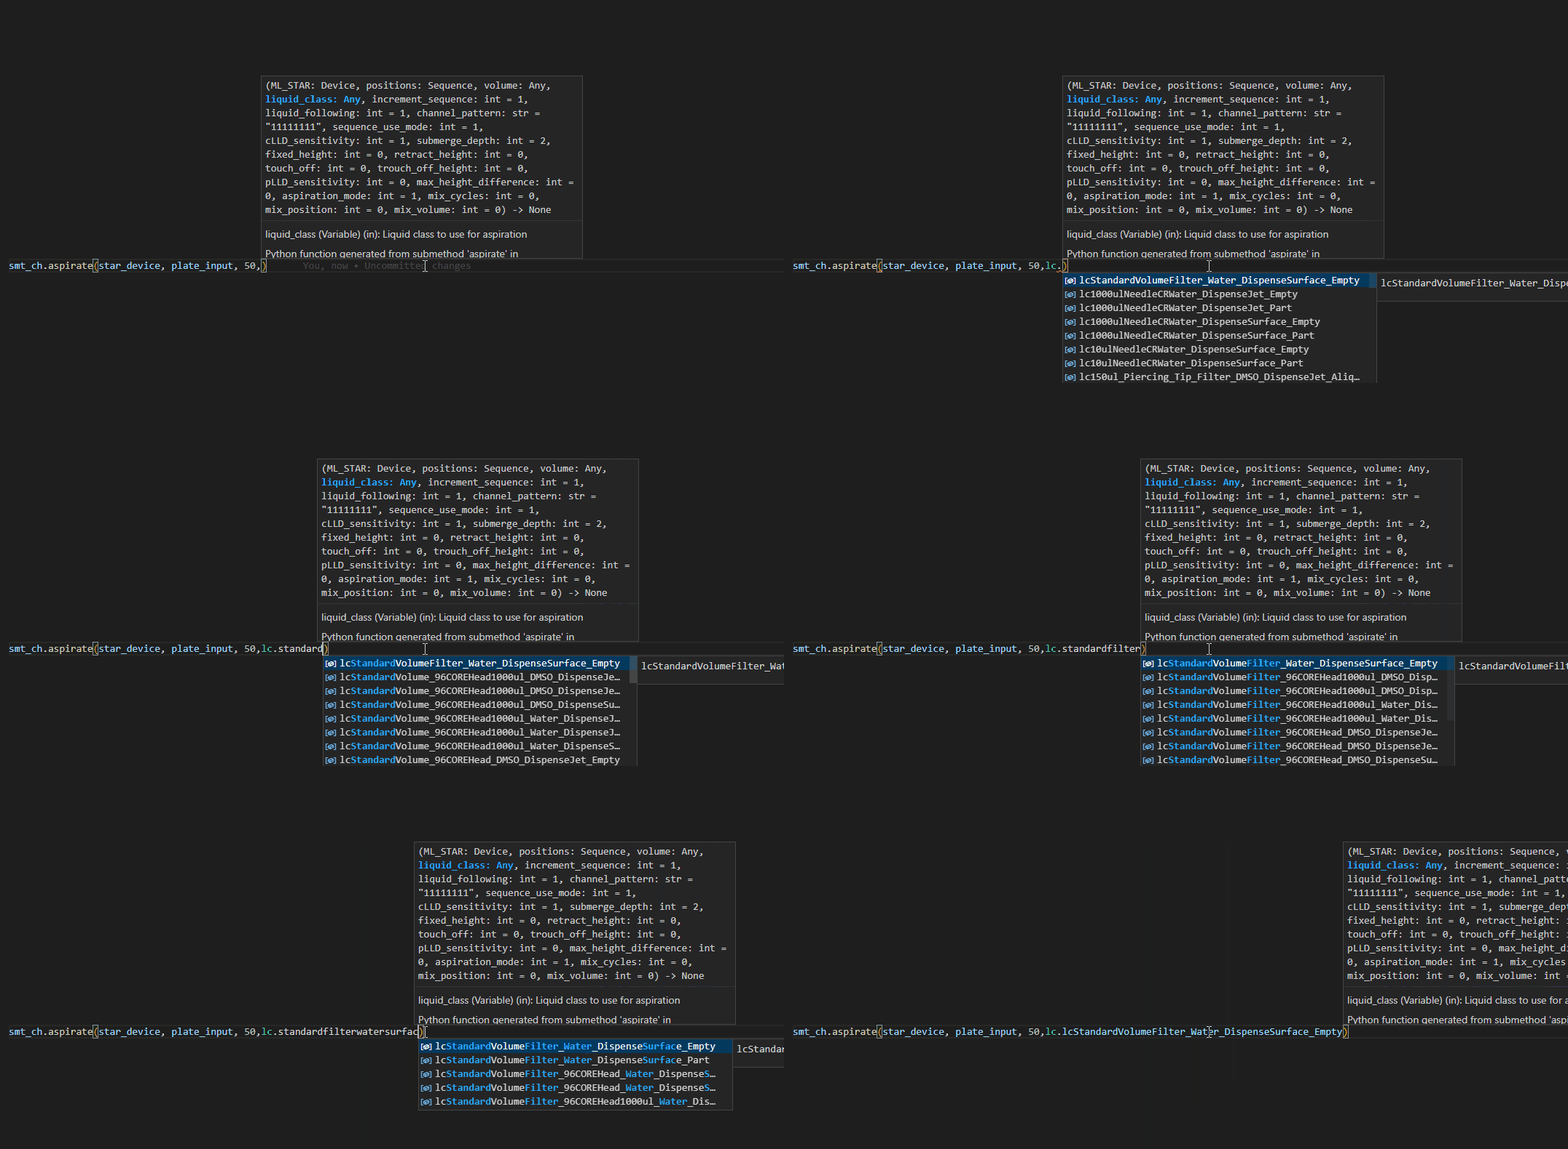
As you can see PyVenus is build to work well with IDEs like Visual Studio Code or PyCharm, giving you all the relevant information through IntelliSense as you type your code.
PyVenus is not yet published to PyPI (coming soon...), so the best way to install it currently is by doing a pip install directly from the git repository. This will install it as a package into your virtual environment. If you want to run the example methods you can also clone the full repository.
In both cases a prerequisite is to have Python (>= 3.9) and Venus (tested with Venus 4) installed.
Before installing PyVenus I would recommend setting up a virtual environment. Create a new folder and run the following commands:
python -m venv .venv
".venv/Scripts/activate.bat"
After this you can install PyVenus using pip:
pip install pyvenus
You can setup some basic method structure by calling the following from the terminal window:
pyvenus-setup
After installing the package with pip (shown above) you can setup the example methods by running this command from the same terminal:
pyvenus-setup --example-method
To be able to run the example method you need to generate python classes from the example deck layout and submethod libraries. The update_resources.py script is setup to just that (more details here).
Run this command in the same terminal window:
py update_resources.py
After this you should see a new folder called venus_resources and you are ready to start the example method.
As explained above PyVenus works best when used together with an IDE like VS code or PyCharm.
Let's have a step-by-step look at the example method (example_method.py) that comes with PyVenus.
First we import the required functionality from PyVenus as well as the pandas library (used for an example at the end)
from pyvenus import Connection,Variable,Sequence,Device,Helpers
import pandas as pd
Next all the python classes generated by PyVenus are imported. To update these resources run update_resources.py (more on that later).
from venus_resources import Example_layout as lay
from venus_resources import LiquidClasses as lc
from venus_resources import Ml_star
from venus_resources import Channels1ml_8
from venus_resources import Pipetting- Example_layout is a representation of the Venus deck layout (
example_layout.lay) and gives easy access to deck sequence and labware item names. - LiquidClasses gives access to the liquid class names extracted from the database.
- Ml_star, Channels1ml_8, and Pipetting are submethod library examples that ship with PyVenus.
Both the liquid and deck layout classes are not meant for executing any code, but simple are helpers to access information from these files in your method. For example, instead of writing out the name of a liquid class you can simply include a reference to it via the liquid class object, removing the need for guesswork or copying strings in-between Venus and Python. It also allows for easy searching via Intellisense, as shown in the example below.
A crucial step is initiation of the Connection object, which will start the Hamilton Run Control.
con = Connection()Next the device object for the Microlab STAR is initiated. This will define the deck layout file to use by the method. Similar to the example above ther is no need to write out the name of the deck layout file. We can simply pull that information from the layout class imported before.
Furthermore, each Python class representing a submethod library is initiated. There is no need to initiate the liquid and deck layout classes as they are static.
star_device = Device(con, lay.layout_file)

smt_star = Ml_star(con)
smt_ch = Channels1ml_8(con)
smt_pip = Pipetting(con)Sequences are a critical component of any Venus method. Existing deck sequences can be initiated in Python in the following way. It is of course also possible to build sequences dynamically within python. This is discussed further down.
tips_1000F = Sequence(con, lay.Sequences.MlStar1000ulHighVolumeTipWithFilter, deck_sequence=True)
tips_50F = Sequence(con, lay.Sequences.MlStar50ulTipWithFilter, deck_sequence=True)
buffer = Sequence(con, lay.Sequences.trough1, deck_sequence=True)
plate_input = Sequence(con, lay.Sequences.plate_input, deck_sequence=True)
plate_dilution = Sequence(con, lay.Sequences.plate_dilution, deck_sequence=True)
hitpicking_dispense = Sequence(con, name=lay.Sequences.plate_hitpicking, deck_sequence=True)
waste_ch = Sequence(con, lay.Sequences.Waste, deck_sequence=True)
It is important to understand that PyVenus itself does not implement any of the functions present in Venus (e.g. aspiration). Instead functions from Venus are made available by creating submethod libraries, which can then be called in Python using PyVenus.
PyVenus ships with a few example libraries that examplify the usage. One is the ml_star.smt submethod library, which currently only contains one submethod (initialize), which is a simple wrapper for the Initialize command for the STAR.
In the future we can add additional functions related to the STAR, like enabling aspiration monitoring (MAD).
Now that all the neccessary classes are present we can call the initialize command. This will pass the command to the Run Control and make the robot go through its initialization routine.
smt_star.initialize(star_device)A quick example of a typical pipetting loop is shown below for a simple transfer from a trough to a 96-well plate. This example uses the channels1mL_8.smt submethod library, which contains simple wrappers for the basic functions of the pipetting channels.
smt_ch.tip_pickup(star_device, tips_1000F)
while plate_dilution.current > 0:
    smt_ch.aspirate(star_device, buffer, 100, lc.lcHighVolumeFilter_Water_DispenseSurface_Empty, increment_sequence=0)
    smt_ch.dispense(star_device, plate_dilution, 100)
smt_ch.tip_eject(star_device, waste_ch)
plate_dilution.current = 1
It is important to note these functions have many more parameters (screenshot below), thus giving access to all the functionality of Venus single steps involved. The reason we can use only a small set of parameters is because for most of the parameters a default value was definined in Venus as explained later.
A different approach is to define a submethod that is setup to do a trough-to-plate transfer and call this directly. I envision this as the preferred approach, i.e. defining the functionality you need in Venus in submethods.
smt_pip.add_buffer(star_device, buffer, plate_dilution, tips_1000F, 100)It is of course also possible to define output parameters on submethods and use them to return data from Venus to Python. This simple submethods transfers multiple 96-well plates into a single plate and returns the number of plates transferred as an output parameter.
To receive a value back from Venus you need to define it as one of the PyVenus data types (Sequence, Variable, Array), that mirror the corresponding data types in Venus.
number_of_transfers = Variable(con)
smt_pip.input_to_dilution(star_device, plate_input, plate_dilution, tips_50F, 10, number_of_transfers)
print(f"Number of transfers: {number_of_transfers}")Instead of using deck sequences it is also possible to define sequences dynamically. The sequence object has a number of methods to help with this. One option is the .from_list() method accepts two parameters: a list of labware names and a list of positions.
If both lists are not of the same length the shorter one is recycled as illustrated in these examples:
- For a sequence of A1 in three different plates: ["plate1", "plate2", "plate3"], ["A1"]
- For a sequence of A1 through C1 on one plate: ["plate1"], ["A1", "B1", "C1"]
PyVenus comes with some helpers to easily generate list of positions fitting with common plate formats: Helpers.get_well_map()
Labware IDs valid for the current deck layout can easily be retrieved via the deck layout class.
As shown below, the sequences can just be initiated inline with the call to the pipetting submethod:
smt_pip.input_to_dilution(
    star_device,
    Sequence(con).from_list([lay.Labware.mtp_plate], Helpers.get_well_map(96)),
    Sequence(con).from_list([lay.Labware.dwp_plate], Helpers.get_well_map(96)),
    tips_50F,
    10,
    number_of_transfers)
The sequence class internally uses the pandas dataframe to store all the positions in a sequence. Another way to setup a sequence is using the .from_dataframe() method, which takes a pandas dataframe as input.
This makes it easy to load a correctly formatted worklist file for e.g. hitpicking:
hitpicking_aspirate = Sequence(con).from_dataframe(pd.read_excel("example_worklist.xlsx", "Sheet1"))Both the .from_list()and .from_dataframe() method support the option of appending the new positions instead of replacing the sequence content.
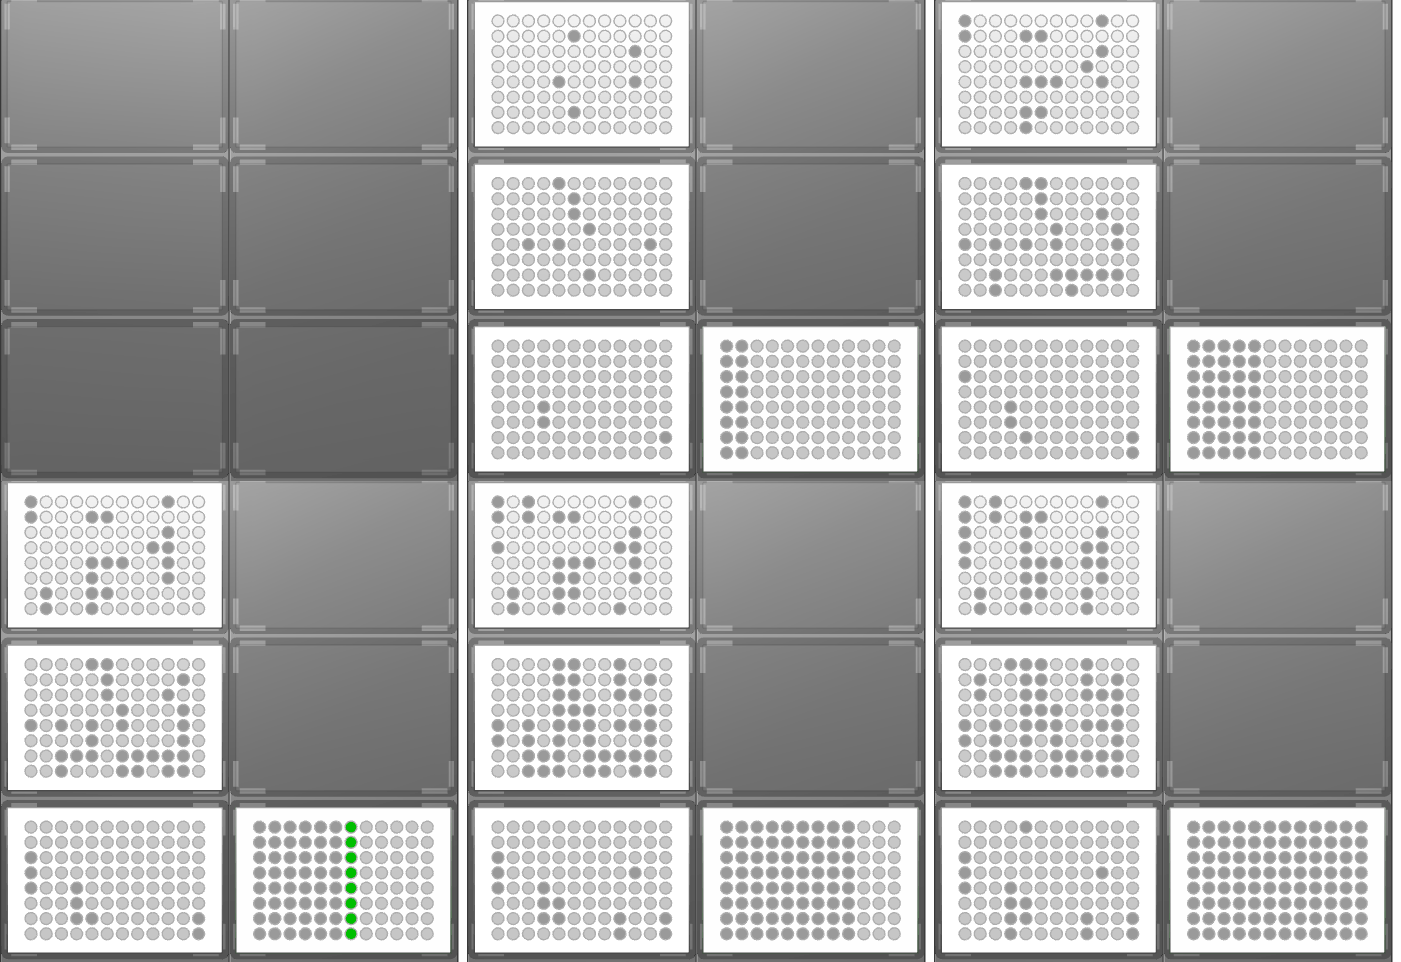
A common problem with hitpicking applications is that the input file will not be sorted for pipetting. This can easily be seen with the sequence generated above:
This can easily be solved in PyVenus by combining the power of pandas dataframes with sequences. Using method chaining the required sequence can be generated in one easy-to-read code block:
- An empty sequence is initiated
- All positions from the worklist file are added
- The sequence object is converted to a pandas dataframe which includes the deck coordinates for each position
- The dataframe is sorted by the x and y coordinates
- The dataframe is converted back to a sequence object
hitpicking_aspirate = Sequence(con)
(hitpicking_aspirate
    .from_dataframe(pd.read_excel("example_worklist.xlsx", "Sheet1"))
    .get_dataframe(include_position_data=True)
    .sort_values(by=['x','y'], ascending=[True,False])
    .pipe(hitpicking_aspirate.from_dataframe)
)
The pandas library includes a multitude of functions to manipule dataframes. By using the same basic steps all of these functions are available for manipulating sequences.
The final step of a PyVenus method should be the .close() command, which shuts down the Hamilton Run Environment.
con.close()Venus has the following main data types:
- Device (the ML_STAR device for the robot or the HxFan device for the HEPA filter)
- Variable
- Sequence
- Array of Variables (simply called Array in PyVenus)
- Array of Sequences
All of these (except for Array of Sequences, which is currently not available) are implemented in Python through corresponding classes. This neccessary for supplying the correct information to Venus and to make it possibel to define output parameters in Python.
The main use for this object is to initialize the device for the main robot
star_device = Device(con, path_and_filename_of_deck_layout)The Device class has two additional parameters (name, main), which are used when initiating additional devices. For example the driver for the HEPA filter and BioTek plate readers require a device object. In this case you have to supply the name parameter that should match the name the device has in Venus.
Lastly, the main parameter should only be True for the main robot device.
hepa_device = Device(con, path_and_filename_of_deck_layout, "HxFan", False)In principle, PyVenus should also work for a Nimbus or Vantage where the robot device will have a different name, but this has not been tested yet.
Just as in Venus a sequence is at it's core a table with two columns (labware ID, position ID), as well as a current and end position. In Python this is implemented by using a Pandas dataframe.
More information on how to work with sequences can be found in the discussion of the example method above.
A variable works just like a standard Python variable. The difference is that it has to be initiated like a class (var = Variable(starting_value)) and its value has be set using the value property (var.value = new_value)
Using the Variable class from PyVenus is only required when working with output parameters. Otherwise, simply specifying the value or passing a normal Python variable also works. All three examples below give the same result:
smt_ch.aspirate(star_device, buffer, 100, lc.lcHighVolumeFilter_Water_DispenseSurface_Empty, increment_sequence=0)

volume = 100
smt_ch.aspirate(star_device, buffer, volume, lc.lcHighVolumeFilter_Water_DispenseSurface_Empty, increment_sequence=0)

volume = Variable(100)
smt_ch.aspirate(star_device, buffer, volume, lc.lcHighVolumeFilter_Water_DispenseSurface_Empty, increment_sequence=0)The Array class in PyVenus extends the build in functionality of lists. This means that once initialized it can be treated like any other list in Python.
test = Array(con, [1,2,3,4])
print(test)
>>> [1, 2, 3, 4]
test[1]
>>> 1
test.append(5)
print(test)
>>> [1, 2, 3, 4, 5]Through PyVenus it is possible to define default values for parameters in submethods. This makes your code more readable because in Python you only need to specify the parameters where you deviate from the default values.
Currently this is only possible for a Variable of type Input
All that needs to be done is to include {{default:value_to_use}} in the description of the parameter as shown below. String values need to be enclosed in quotes.
This is translated to default values in the method definition in Python:
Whenever a change is made to something in Venus (e.g. submethod library, deck layout, new liquid class) the code generated by PyVenus needs to be updated.
For each of the different resource types exists a method in the Resources class. PyVenus includes an example in update_resources.py.
from pyvenus import Resources

Resources.read_layout("example_layout.lay")
Resources.read_liquid_classes(True,False,True,False,False, include_custom=False)
Resources.read_submethods()
This will have to be customized to your method and system configuration:
- update the
.read_layout()method to the name of your deck layout. The layout file is expected to be in the same folder as the script - update which liquid classes should be visible in Python (e.g. include/exclude channels, MPH, etc.)
- add additional calls to
.read_submethods()to load additional submethods from other locations
By default the .read_submethods() function will convert all submethod libraries found at ./smt/. But you can specify a path through an optional parameter if you want to convert submethod libraries in other locations.
In many cases this makes it easy to use existing drivers for Hamilton or third-party devices in PyVenus. Many of those include a submethod library. As an example the Hamilton pH module has a submethod library in this driver folder (C:\Program Files (x86)\HAMILTON\Library\Hamilton pH Module).
The example below (see also example_ph_module.py) shows how to process the submethod library, and use it to initialize the pH module.
from pyvenus import Resources, Connection, Device, Variable

Resources.read_submethods(r"C:\Program Files (x86)\HAMILTON\Library\Hamilton pH Module")

from venus_resources import Example_layout as lay
from venus_resources import Hamilton_ph_module_controller

con = Connection()
star_device = Device(con, lay.layout_file)
ph_module = Hamilton_ph_module_controller(con)

default_temperature = Variable(con)
ph_module_id = Variable(con)

ph_module.Initialize(star_device, 1, default_temperature, ph_module_id)

print(default_temperature)
print(ph_module_id)

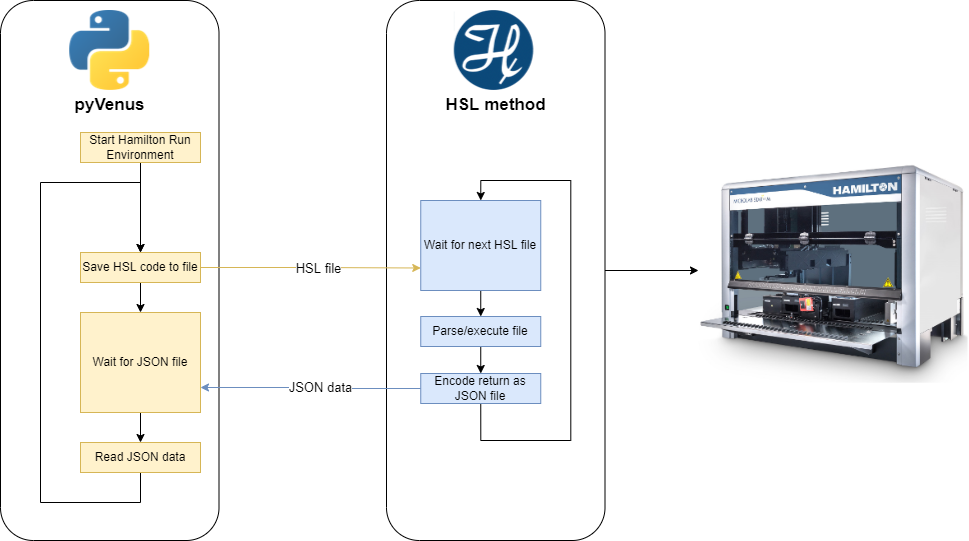
con.close()When a method is designed in the graphical interface of Venus an underlying method is generated in HSL (Hamilton Standard Language). PyVenus works by passing new HSL code to an already running method and letting it execute it on the fly. Since HSL underlies the Venus environment it gives you the same capabilities as the graphical interface.
The core module of PyVenus (the Connection class) takes care sending HSL code to the Venus environment and receiving results formatted in JSON.
But, lets face it nobody wants to clutter up their Python code with snipets of HSL code. Instead PyVenus uses generated Python classes as an abstraction layer to the HSL commands
This repository is an early release that still needs to be thoroughly tested. Nonetheless it is fully functional.
Submitting issues on GitHub or pull requests with new features or bug fixes is highly encouraged.
